Knowledge Base
* Remove power supply from socket for 30 seconds.
* Disconnect Robot and turn power supply on If not working, change to another socket.
Reconnect the floating cable into the power supply.
Flip the robot upside-down.
Try to rotate the wheels by hand.
Check for and remove any debris in the driving system such as hair, string or leaves.
Remove the top screws on the outlet top and check if the propeller needs to be cleaned.
* Remove the robot from power before starting.
(When reassembling the top cover, use only manual tool.
DO NOT USE power-tool for this operation)
Turn the Robot upside down, and try to turn it on – check if pump and motor start functioning.
Send the unit to your service center.
Remove the filter, and run the robot without the filter. If working well - clean the filter well or replace filter.
Remove the top screws on the outlet top and check if the propeller is broken or need to be cleaned.
* Remove the robot from power before starting.
(When reassembling the top cover, use only manual tool.
DO NOT USE power-tool for this operation)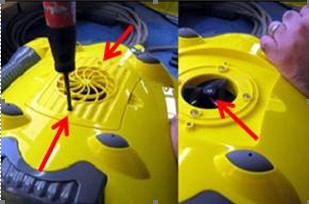
Send the unit to your service center.
- Rotate the wheels by hand.
- Clean and remove Obstacles if necessary
- Check the internal teeth of the drive belts of both Master and Slave sides.
- Bring to service if worn
Send the unit to your service center.
Remove the filter, and run the robot without the filter. If working well - clean the filter well or replace filter.
Sometimes the filter is blocked but seems clean. Can clean by soaking in water+soap for 30 minutes and then gently scrub the surface from inside.
Remove the top screws on the outlet top and check if the propeller needs to be cleaned.
*remove the robot from power before starting.
(When reassembling the top cover, use only manual tool.
DO NOT USE power-tool for this operation)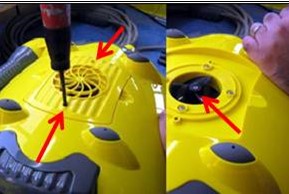
- Rotate the wheels by hand.
- Clean and remove Obstacles if necessary.
Send the unit to your service center.
Clean as necessary and verify that there no holes in the filter.
Remove the top screws on the outlet top and check if the propeller is broken or need to be cleaned.
*remove the robot from power before starting.
(When reassembling the top cover, use only manual tool.
DO NOT USE power-tool for this operation)
Check the Intake Valve Flaps on the underside of your unit.
The Flaps should move freely to open and close.
Clean and free the Valve Flaps if necessary.
Valve flaps location
In different models:
Check the non-return valves on the unit.
The valves should be complete and cover the entire hole.
Non-return Valve location: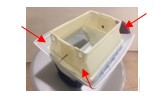
Make sure that the bottom lid is properly closed.
Verify that there are no holes in the filters, and that filter frame is complete.
Check the Intake Valve Flaps on the underside of your unit.
The Flaps should move freely to open and close.
Clean and free the Valve Flaps if necessary.
Valve flaps location
In different models: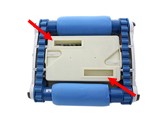
Send the unit to your service center.
Make sure all filters are clean.
Verify that there is enough cable in the water to reach the far end of the pool but not more than that.
Make sure that the floating cable is properly spread out and is untangled.
Increase diagonal Angle of the handle by pressing the handle pin and move it in opposite directions.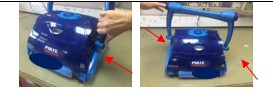
Make sure that PH is between 7.2 and 7.6
if not - make proper adjustments.
Remove the robot from the pool during this treatment.
Check water Chlorine treatment, if water is not treated - make Shock Chlorine treatment.
Remove the robot from the pool during this treatment.
Remove the top screws on the outlet top and check if the propeller is broken or need to be cleaned.
*remove the robot from power before starting.
(When reassembling the top cover, use only manual tool.
DO NOT USE power-tool for this operation).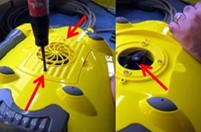
Try to rotate the wheels by hand.
Clean and remove Obstacles from the driving system as necessary.
Send the unit to your service center.
Verify that your unit is not Floor-only model.
Ask customer to read robot part# on the sticker.
If includes - REFL the robot is not intended to climb.
Remove the filter, and run the robot without the filter. If working well - clean the filter well.
Sometimes the filter is blocked but seems clean.
Remove the top screws on the outlet top and check if the propeller is broken or need to be cleaned.
*remove the robot from power before starting
(When reassembling the top cover, use only manual tool.
DO NOT USE power-tool for this operation)
Check water Chlorine treatment, if water is not treated - need Shock Chlorine treatment.
Remove the robot from the pool during this treatment.
Make sure that PH is between 7.2 and 7.6 if not - make proper adjustments.
Remove the robot from the pool during this treatment.
Check water temperature – if below 130C add floats according to your robot model.
Send the unit to your service center.
Check The batteries by pressing the Buttons - the red light on the remote control unit will not flash if battery is empty.
Send new battery to customer if needed.
Match the remote with the power supply.
See Remote Control Manual.
Send the unit to your service center.
Make sure all filters are clean.
Make sure the bottom lid is properly closed.
Make sure that the floating cable is properly spread out and is untangled.
Verify that there is enough cable in the water to reach the far end of the pool but not more than that.
For example if the pool is 10 X 5 meters and the power supply is at the middle,
put only 6 meters of cable into the pool.
Remove the top screws on the outlet top and check if the propeller is broken or need to be cleaned.
*remove the robot from power before starting
(When reassembling the top cover, use only manual tool.
DO NOT USE power-tool for this operation).
Send the unit to your service center.
Verify to take robot our when making chemical treatment.
If the PVA Sponge is fully dissolved/destroyed – send the unit to your service center for replacement.
Check water Chlorine treatment; make sure that the Chlorine level is not too high.
If the PVA Sponge is fully dissolved/destroyed – send the unit to your service center for replacement.
Make sure that PH is between 7.2 and 7.6 if not - make proper adjustments.
If the PVA Sponge is fully dissolved/destroyed – send the unit to your service center for replacement.
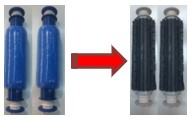
Send the unit to your service center to Change PVA wheels to PVC Wheels.
Reduce float on bottom lid or opposite to motor.
Make sure that PH is between 7.2 and 7.6 if not - make proper adjustments.
Send to service center to replace to PVC wheel.